|
Article ID: 60
Last updated: 15 Sep, 2008
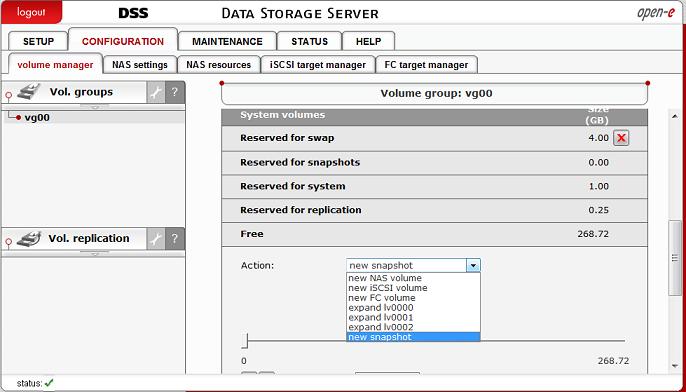
Creating and using Snapshots in Open-E To use the snapshot feature, you must create a new snapshot in Volume Manager.  In this example, I am reserving 2GB for my snapshot. Use the slider, or enter your snapshot size in the add: field. It is best to use a small number to begin with until you understand how snapshots function. Click 'Apply'.
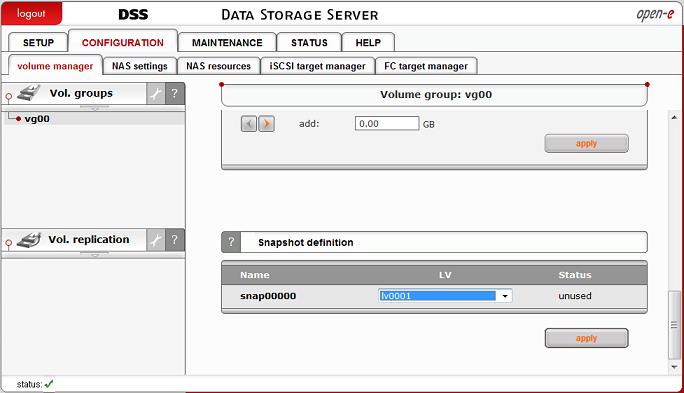
Next, you need to assign the snapshot to a logical volume.
Scroll down to Function: Snapshot Definition. Use the drop down box to assign the snapshot. I have selected lv0001. Click 'Apply'.
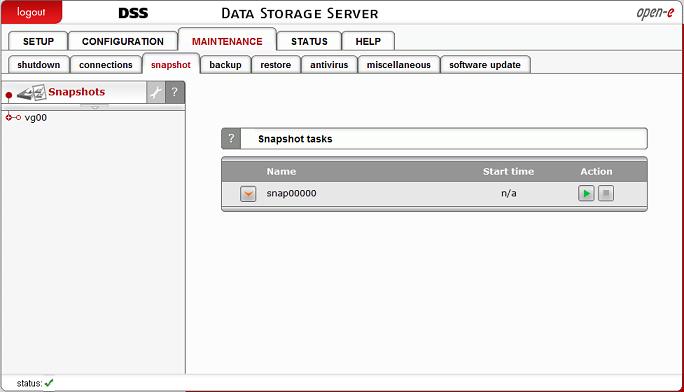
 Now, to start your snapshot, you can go to MAINTENANCE -> snapshot ->
Function: Snapshot tasks and start capturing data in the logical volume. Click on the green play button to create your snapshot.
 How to access a NAS snapshot Go to CONFIGURATION ->NAS settings and select the network protocol on which the snapshots will be accessible, exactly like all other shares. This needs to be done only once. When establishing access to a snapshot the second time, this action is not necessary. You can activate access to snapshots using the following protocols:
• NFS • SMB (Network neighborhood) • FTP
• AFP
Now create a new share that will be assigned to the activated snapshot. Go to CONFIGURATION -> NAS resources -> Function: Create new share
Enter a share name. Now use the Specified path option to select the snapshot to which you want access.
Click 'Apply' to create the share.
.png) Once you have your share, you can view the contents of the share on your network by mapping a logical drive to the snapshot share on your client workstation.
How to access an iSCSI target snapshot
After a snapshot for an iSCSI target has been created and activated, you can access it by following these steps:
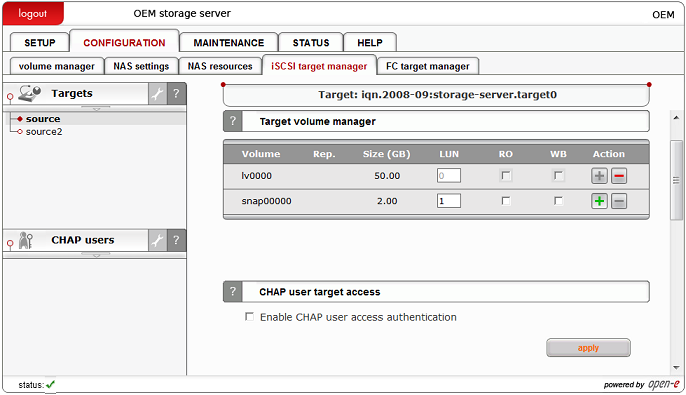
Go to CONFIGURATION ->iSCSI target manager -> Targets -> [target_name]
Function: Target volume manger Click the Add button on the right side of the snapshot to which you want access. A new LUN will be added to the target.  Now use your iSCSI initiator to connect your snapshot target.
As an example, in a Microsoft Windows environment, you can download Microsoft iSCSI Initiator and follow its instructions.
You can find the download page link below for your convenience. Launch the software and add targets. Access the Target Portals menu and enter the IP address of the iSCSI server and the socket (the default is 3260). In the Available targets menu, log into the previously added target.
Now mount your target using Disk Manager, format it, and it is ready to use. Additional notes:
The snapshot utilizes copy-on-write technology. The more active snapshots you have, the lower the write performance of the volume will be. It is recommended to have no more than 2-3 active snapshots per volume.
Snapshots cannot be activated on an inconsistent volume. Inconsistent volumes exist on the destination system, while volume replication is initializing. Once initialization is completed, the inconsistent volume will be consistent and the snapshot can be activated.
It's not possible to do data replication and backup at the same time. Also, backup has a higher priority than data replication. Data replication will be stopped, if it has been scheduled at the same time as Backup, when using snapshots from the same Logical Volume. You will see a snapshot error in the Data replication status, because snapshots cannot be used twice at the same time, if they are assigned to the same Logical Volume.
|
||||||||||||||||||||||
