|
|
|
|
Article ID: 3381
Last updated: 20 Dec, 2022
What is a self-encrypting drive (SED)? A Self-Encrypting Drive (SED) is a hard disk drive (HDD) or a solid-state drive (SSD) designed to automatically encrypt and decrypt drive data without the need for user input or disk encryption software. SED support is a new feature in Open-E JovianDSS from version up29r2. Self-encryption is a powerful tool to elevate the security of your data. Thanks to the Open-E Text User Interface, setting it up requires only a few steps.
Using a self-encrypting disk requires setting a password for your data. If you forget the password, the data is permanently lost!
Disks supported by Open-E JovianDSS are present in our Hardware Compatibility List. To find them, search the list for “SED” (case-sensitive) or enter the link below:
Currently, none of the supported disks is FIPS-compliant.
To enable SED functionality and access the SED settings, hit the “CTRL-ALT-T” hotkey on the console and enter Boot options → Boot parameters.
Select the “SED libdata.allow_tpm” option and click the “Apply” button. Confirm your choice by selecting the “Save changes!” option and clicking the “Apply” button again. The changes done here will be visible only after a system reboot.
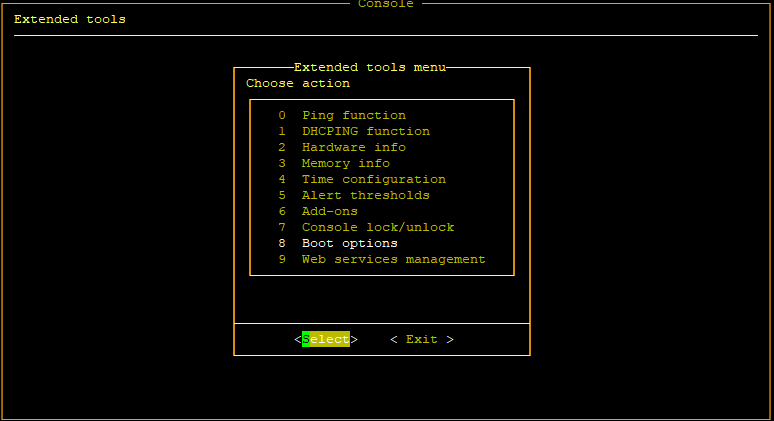
After enabling the SED options and rebooting the system, enter the Extended Tools menu by hitting the “CTRL-ALT-X” hotkey, provide the system password, and choose the “Self-encrypting drives (SED) settings” option.
You will see two distinct options:
The first option allows you to set a password for selected SED-supporting drives.
The prompt will ask you to provide this password two times for verification purposes. Do not lose your password. If you forget it and change the password to a new one, all data will be lost! After setting the password successfully, you are allowed to choose the password-accessed drives by choosing the second option, “Select the password-accessed drives”. There, Open-E JovianDSS will ask if the password should be applied to all disks or only to the selected ones.
Choosing the first option will encrypt all drives that support SED encryption. The second option will display a table of disks that can be encrypted. Here you can choose and activate SED for chosen disks by pressing the “Set password access”.
To check whether the SED is active on selected disks, launch a different operating system (e.g. Debian OS) from a bootable drive and check the available disks. If the disk is not visible there, SED has been successfully enabled.
The only way to disable SED functionality is to reset the disks to the factory default settings. To do that, access Extended settings (hot-key “CTRL-ALT-X”) → Self-encrypting drives (SED) settings → Select the password-accessed drives, where disks that support SED encryption will be displayed. After choosing proper disks and pressing “Reset to defaults” button, provide the PSID of the disk you want to reset.
If you selected more than one disk, you must provide the PSID for each disk. The PSID can be found on the disk label and can only be obtained by pulling the disk out and checking it manually. Below, you can see an example of such a label for one of our supported drives.
Once you complete the reset, the disk will restore the factory settings, deleting all the data and disabling the SED encryption.
Share this article
Link to article
|
.png)
.png)
.png)
.png)
.png)
.png)
.png)
.jpg)
